

Table of Contents
- Assess Your Space and Plan Your Layout
- Declutter and Inventory Everything
- Vertical Storage for Laundry Rooms: Maximize Wall Space
- Small Laundry Room Storage Ideas for Appliances and Supplies
- Laundry Room Organization Hacks for Maximum Efficiency
- Budget-Friendly DIY vs. Professional Installation
- Maintain Your Organized Laundry Room Long-Term
- Frequently Asked Questions
Last Updated: September 19, 2026
Learning how to organize a tiny laundry room step by step transforms a cramped space into a functional area. You don't need a bigger room, you need a smarter plan.
Most people buy storage first and hope it fits. The better approach: assess what you have, declutter ruthlessly, then install solutions that match your space and workflow.
Assess Your Space and Plan Your Layout
Before you buy a single shelf or basket, follow how to organize a tiny laundry room step by step by measuring your room and understanding how you actually use it.
Measure Your Square Footage and Identify Constraints
Measure width, length, and ceiling height. Note door swings, pipes, vents, and moisture-prone areas near the dryer.
Identify problem spots:
- Slanted ceilings that limit shelf height
- Outlets that dictate where appliances go
- Plumbing that blocks wall space
- Moisture-prone corners near the dryer vent
These constraints shape your plan. Respect them instead of fighting them.
Map Out Your Laundry Workflow
Map how laundry moves through your space: where dirty clothes enter, where you sort, where you fold, and where finished laundry exits.
Map it like this:
- Entry point: Where dirty laundry arrives
- Sorting zone: Where clothes get separated
- Washing station: Washer location and detergent access
- Drying zone: Dryer or drying rack placement
- Folding area: Where clean clothes get folded
- Exit point: Where finished laundry leaves
A good workflow prevents backtracking. If your dryer is far from your folding surface, you waste steps every load.
Declutter and Inventory Everything
Before touching storage solutions, remove everything that doesn't belong.
Pull everything out and sort into three piles: keep, donate, trash.
Be honest about what you actually use:
- Cleaning supplies you haven't touched in six months? Gone.
- Laundry products you've replaced? Donate them.
- Broken hangers or worn-out clotheslines? Trash.
- Duplicate detergent bottles? Keep one, donate the rest.
Count what stays. How many detergent bottles, rags, and cleaning supplies do you actually use? This becomes your storage baseline.
Vertical Storage for Laundry Rooms: Maximize Wall Space
Tiny laundry rooms have one massive advantage: walls. Use them.
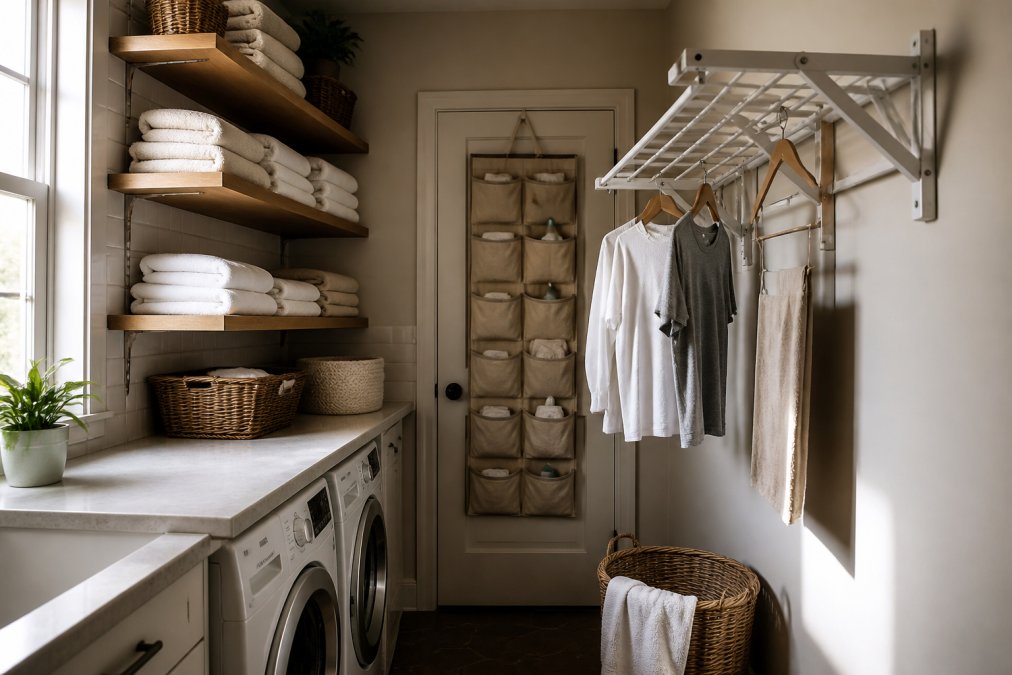
Install Floating Shelves and Wall-Mounted Racks
Floating shelves add storage without eating floor space. Mount them 12 to 18 inches apart for easy access.
Wall-mounted drying racks provide space for damp clothes and fold down when not in use.
Label each shelf and basket so everyone knows where things go. This prevents the system from falling apart.
Install shelving at different heights: high shelves for seasonal items, mid-level for daily-use detergent, lower shelves for heavier items.
Use Door-Mounted Storage
An over-the-door organizer holds cleaning supplies and small bottles. A door rack mounts an ironing board vertically, saving floor space.
Small Laundry Room Storage Ideas for Appliances and Supplies
Your appliances take up half the room. Organize around them strategically.
Stack and Arrange Stackable Appliances
Stacking a washer and dryer saves floor space for a folding surface or storage bins. Ensure ceiling height allows it.
Push non-stackable appliances into a corner to clear the center for movement and work surfaces.
Organize Detergent, Fabric Softener, and Cleaning Supplies
Organization keeps laundry supplies contained and prevents spills.
Store detergent and fabric softener in clear, labeled containers. Group similar items together for easy restocking.
The Reset Aisle's Under Sink Organizer with Sliding Shelves ($34.99) stores bottles upright with easy access and saves space.

Keep harsh chemicals like bleach separate from laundry supplies and away from where you handle clothes.
Under Sink Organizer with Sliding →
Laundry Room Organization Hacks for Maximum Efficiency
Small spaces demand smart systems. These hacks keep your organized laundry room from sliding back into chaos.
Label Everything and Create a Maintenance System
A label maker is worth every penny. Label shelves, bins, baskets, and containers.
Labels make it easy to put things away. Without them, items drift and chaos returns.
Spend five minutes weekly returning items to their labeled homes. This keeps the system working.
Manage Moisture and Ventilation
Laundry rooms get humid. Ventilation prevents moisture damage and mold.
Ensure your dryer vents outside. Check the vent hose twice yearly for lint buildup.
Use a wall-mounted drying rack instead of draping wet items everywhere. This concentrates moisture in one area.
Run a fan while the dryer operates to push moisture out and prevent dampness.
Keep storage bins off the floor. Use shelves or wall-mounted storage to protect items from moisture.
Budget-Friendly DIY vs. Professional Installation
You can install storage yourself or hire a professional. The choice depends on budget, wall type, rental status, and time.
DIY Installation: When It Makes Sense
DIY costs $100 to $250 total: floating shelves ($20-$50 each), over-the-door organizers ($15-$40), under-sink organizers ($34.99), wall-mounted drying racks ($30-$80).
DIY makes sense if you own your home, have standard drywall, are comfortable with a drill, have time to install, and want customized placement.
For drywall: find studs with a stud finder, mark locations with a level, drill pilot holes, install anchors, and hang shelves.
Professional Installation: When It's Worth the Cost
Professional installation costs more but saves time and reduces risk. A handyman charges $50 to $100 per hour. Shelving installation typically takes 1 to 3 hours depending on complexity. Labor cost: $150 to $300, plus materials.
Professional installation makes sense if:
- You rent and need to avoid wall damage (a professional can use damage-free mounting options)
- Your walls are plaster, tile, concrete, or have unusual stud placement
- You want shelves perfectly level and securely anchored
- You don't have time or confidence to DIY
- You're installing heavy shelving that will hold 50+ pounds of supplies and folded items
Renters vs. Homeowners: Different Constraints
Renters face a critical constraint: you can't drill into walls without losing your security deposit. This changes the equation entirely.
For renters, focus on damage-free solutions:
- Over-the-door organizers (no drilling)
- Tension rods and shower caddies (no drilling)
- Freestanding shelving units (no installation needed)
- Adhesive hooks and strips (removable, damage-free)
- Magnetic strips on metal appliances
Assess Wall Type Before You Commit
Your wall type determines difficulty and cost.
Drywall (most common): Easiest to work with. Standard drywall anchors hold 25 to 50 pounds. Studs hold 100+ pounds. DIY is straightforward. Professional installation: $150 to $250 total.
The Hidden Cost of Poor Installation
A shelf installed at the wrong height or angle creates workflow problems. If your detergent shelf is too high, you reach awkwardly every time. If it's too low, you bend over repeatedly. Over weeks and months, this causes back and shoulder strain.
Make Your Decision: A Simple Framework
- Do you own or rent? Renters should prioritize damage-free solutions. Homeowners can drill.
- What's your wall type? Drywall = DIY-friendly. Plaster, concrete, or tile = professional recommended.
- How much weight will you store? Light items (detergent bottles, rags) = DIY-safe anchors. Heavy items (stacked supplies, folded linens) = professional installation or studs.
- Do you have time and confidence? Yes = DIY saves money. No = professional saves frustration.
- What's the cost difference? DIY materials ($100-$250) vs. professional ($300-$500 total). If the difference is $200-$300, professional installation buys you peace of mind and proper ergonomics.
Maintain Your Organized Laundry Room Long-Term
Organization fails when you stop maintaining it. Build habits that keep your system working.
Frequently Asked Questions
What are the best vertical storage solutions for tiny laundry rooms?
Floating shelves, wall-mounted drying racks, and over-the-door organizers are the most effective vertical storage options. Floating shelves maximize wall space without taking up floor room, wall-mounted drying racks air-dry clothes while keeping them off surfaces, and over-the-door organizers store detergent, fabric softener, and cleaning supplies. These solutions work together to organize a tiny laundry room without requiring floor space or professional installation.
How do I organize laundry supplies in a space with limited storage?
Group laundry supplies by category: detergents together, fabric care products together, and cleaning supplies in a separate section. Use clear, labeled storage bins or a tiered under-sink organizer to keep everything visible and accessible. The Under Sink Organizer with Sliding Shelves ($34.99) is designed for this exact purpose, with two-piece construction and sliding shelves that let you customize height for different supply sizes. Label each section so family members know where to find and return items.
What are common laundry room organization mistakes to avoid?
The biggest mistakes are ignoring vertical space, overcrowding shelves, and failing to label containers. Many people store items at eye level when wall space above and below could hold more. Overstuffed shelves become inaccessible and collapse under weight. Unlabeled bins cause items to get lost and duplicate purchases. Also avoid storing wet items without proper ventilation, which leads to mold and mildew. Plan your layout before buying storage, measure your space carefully, and leave room for air circulation.
How can I maintain an organized laundry room so it doesn't fall back into chaos?
Create a simple maintenance routine: spend 5 minutes each week returning items to their labeled spots, wipe down shelves monthly to prevent dust buildup, and check for moisture issues in corners and under appliances. Set a rule that everything has a home and must be returned there after use. Every 3 months, review what you actually use and remove items you don't need. A well-organized laundry room stays organized when family members understand the system and items are easy to access and return.