

Last Updated: October 29, 2026
Quick Summary
To learn how to organize craft supplies in drawers, first sort every supply by craft type before buying any dividers, then match each drawer to what it holds. Keep one category per drawer or compartment, and measure the inside of the drawer before choosing containers.
- Sort all supplies by craft type and toss dried-out glue and broken tools first.
- Match supplies to drawer depth: beads in shallow divided drawers, ribbon in deep drawers.
- Measure the inside of the drawer, accounting for side rails and any front lip.
- Label the container rather than the drawer so labels move with supplies.
- Do a 10-minute monthly reset, emptying one drawer at a time and wiping it down.
Table of Contents
- Why Craft Supplies Drawers Turn Into Chaos
- Step 1: Sort Every Supply by Craft Type Before You Buy Anything
- Step 2: Match Each Drawer to What It Holds
- Drawer Dividers for Craft Supplies: Choosing the Right Kind
- How to Organize Beads and Small Craft Supplies Without Losing Them
- Craft Supplies Storage for Small Spaces
- Budget-Friendly Craft Organization That Still Holds Up
- Keep It Tidy: A 10-Minute Monthly Reset
- Frequently Asked Questions
Why Craft Supplies Drawers Turn Into Chaos
Most craft drawers fail for one boring reason: everything goes in together. Ribbon tangles with beads, markers roll under paper, and the glue stick vanishes. Then you buy more supplies because you can't find what you own.
The drawer isn't too small. It may simply need sorting. Learning how to organize craft supplies in drawers starts with one honest rule: a drawer holds one category well, or five categories badly.
Below, we'll show you how to organize craft supplies in drawers with a step-by-step setup. Sort first, buy second.
Step 1: Sort Every Supply by Craft Type Before You Buy Anything
Pull everything out. Yes, all of it. Lay supplies on the floor or a table and group them by craft: paper crafting, crochet, beads, ribbon, drawing tools.
You can sort supplies by use or by size, depending on how you reach for them.
Work through these groups:
- Paper and cardstock
- Markers, pencils, and pens
- Beads and tiny findings
- Ribbon and trim
- Crochet hooks and yarn tools
- Quilling tools and small kits
- Glues, tapes, and adhesives
Toss dried-out glue and broken tools as you go.
What to Group Together and What to Separate
Group supplies that get used together. Keep crochet hooks with stitch markers. Store quilling tools with their paper strips. That way one project needs one drawer.
Separate anything that sheds, leaks, or stains. If you're sorting small toys or bricks alongside craft items, this deeper guide on how to organize LEGO bricks and small toys covers the same grouping logic.
Step 2: Match Each Drawer to What It Holds
Measure your drawer depth and width before assigning anything. Match the supply to the space, not the other way around.
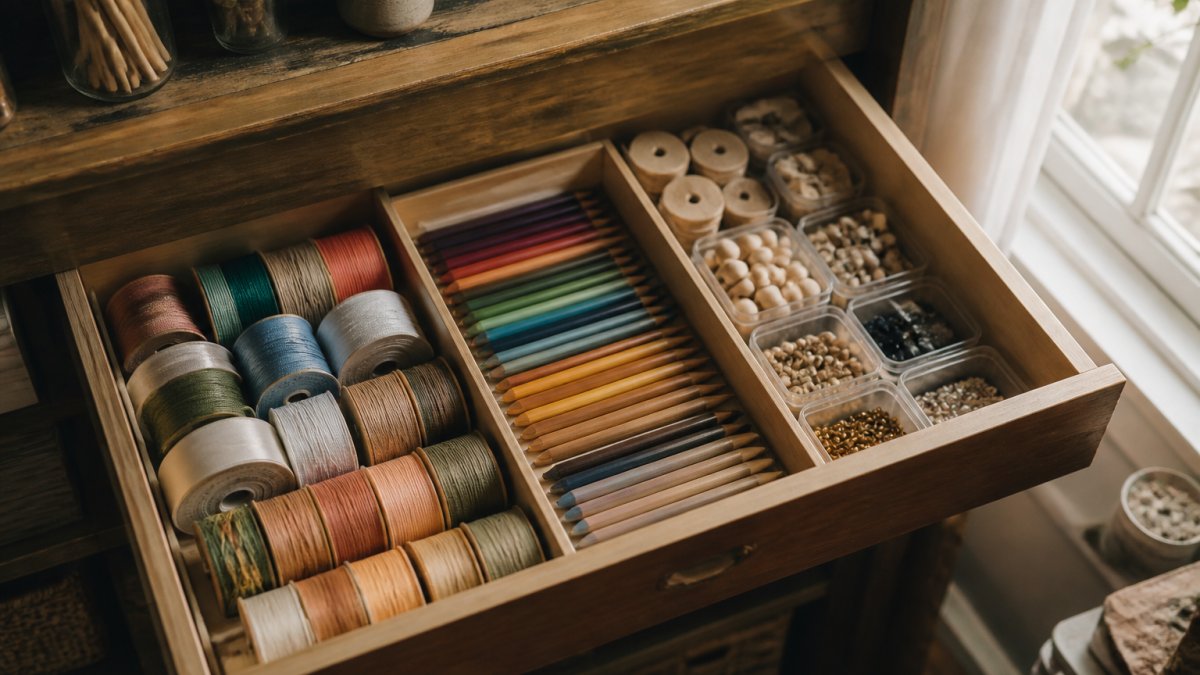
Here's a simple layout guide:
| Supply Type | Best Drawer | Why It Works |
|---|---|---|
| Beads, findings | Shallow, divided | Stays visible, no digging |
| Markers, pencils | Shallow, tray-lined | Prevents rolling |
| Ribbon, trim | Deep, spool holders | Keeps rolls from tangling |
| Paper, cardstock | Wide, flat | Avoids bent corners |
| Glues, adhesives | Deep, upright | No leaks onto other items |
| Crochet tools | Shallow, compartmented | Small items stay put |
Shallow Drawers, Deep Drawers, and What Fits Where
If a deep drawer is all you have, you can consider how to arrange the space to suit your supplies.
Drawer Layouts by Supply Type and Drawer Size
Use these layouts as starting points, then adjust to your actual measurements. The goal is one category per compartment, with the most-reached-for items at the front.
Markers, pencils, and pens, shallow drawer, 3 to 5 inches deep. Line the drawer with a non-slip mat, then set a tray with lengthwise channels so tools lie flat instead of rolling. Keep caps facing the same direction so you can scan colors at a glance. Reserve the front third for the colors you use daily and push seasonal or specialty colors to the back.
Paper and cardstock, wide, flat drawer, 12 by 12 inches or larger. Store full sheets flat in a single stack sorted by color family, with a divider between sizes (for example, 8.5 by 11 and 12 by 12). Keep scraps in a shallow tray at the front so they don't get buried under full sheets. A drawer that is too narrow forces you to fold or trim sheets, which defeats the purpose.
Beads and tiny findings, shallow drawer, 2 to 4 inches deep. Use a compartment tray with removable dividers so you can size each cell to its contents. One color or one finding type per cell, lids on, stored upright. Leave one empty cell as a catch-all for loose pieces in progress.
Ribbon and trim, deep drawer, 6 inches or more. Stand spools on end in a divided insert, or run a dowel through the spool cores so rolls spin in place. Keep a small pair of scissors in the same drawer so you cut where you store. Rolls that lie loose will flatten and tangle.
Glues, adhesives, and paints, deep drawer, upright. Stand bottles and tubes upright in a deep tray with tall sides so nothing tips. Keep a folded paper towel or a small drip tray at the bottom. Store solvent-based adhesives away from paper and fabric, and check caps monthly.
Crochet hooks, needles, and small tools, shallow, compartmented. A compartment tray with a lid keeps hooks from rolling into other sections. Group by size or by project, and keep a small gauge ruler in the same compartment.
What to Do When the Drawer Doesn't Fit the Supply
If a supply doesn't match any drawer you have, don't force it. Three options work better than cramming:
Fabric Drawer Organizers for Socks & Underwear →
- Add a level. A tiered insert or a stack of shallow trays turns one deep drawer into two usable layers.
- Move the supply out. Yarn and large fabric pieces belong in bins or on shelves, not in a shallow drawer.
- Split the category. Keep the tools you use daily in the drawer and store bulk refills elsewhere.
Drawer Dividers for Craft Supplies: Choosing the Right Kind
Drawer dividers are one option to consider when organizing craft supplies.
Pick dividers by supply type:
- Adjustable dividers for mixed drawers that change with your projects
- Fixed compartment trays for beads and tiny parts
- Expandable trays for cutlery-style tools like scissors and rulers
- Fabric bins for soft goods like yarn and fabric scraps
Our expandable drawer organizer has an adjustable length and removable dividers. It's made from white PET plastic and can be wiped clean.

Measure your drawer before choosing a divider.
How to Organize Beads and Small Craft Supplies Without Losing Them
Small supplies are the hardest to keep. Beads roll, findings scatter, and one tipped container means an hour on your knees.
The fix is containment plus visibility. Use small lidded containers, keep them inside a divided drawer, and label each one. Clear or color-coded containers let you spot the right bead without opening five lids.
A few rules that hold up:
- Keep one bead color or size per container
- Store containers upright so lids stay put
- Group findings by type, not by project
- Add a small tray for loose pieces in progress
Sizing Containers to the Drawer, Not the Supply
Most small-supply organizers fail because the containers are chosen by what fits the beads, not by what fits the drawer. Measure the drawer's inside width and depth, then pick a container footprint that divides evenly into it. A drawer that is 14 inches wide, for example, works well with two 7-inch trays or four 3.5-inch trays, odd sizes leave dead space where loose pieces collect.
For beads, a compartment tray with removable dividers is more flexible than fixed cells. Size each cell to its contents: a cell that is too large lets beads slide and mix; a cell that is too small forces you to overfill and the lid pops. Leave one cell empty as a catch-all for pieces in progress.
Labeling That Survives Daily Use
Tape and a marker work, but they peel and smudge. A more durable approach is a label on the lid and on the front edge of the container, so you can read it whether the container is pulled out or sitting in the drawer. Label by category first (for example, "seed beads, blue") and add a second line only if you need it. Keep the label short enough to read at a glance.
When a Container Tips: A Spill-Recovery Plan
Our fabric drawer organizers divide a drawer into sections with internal supports that keep the walls upright even when full, and they fold flat when you don't need them.

Craft Supplies Storage for Small Spaces
For tighter rooms, our guide on sustainable storage for small spaces walks through choosing pieces that fit without crowding the room.
Budget-Friendly Craft Organization That Still Holds Up
Our guide on organizing a small pantry on a budget shares the same cost-first approach, and the tactics transfer straight to craft storage.
Keep It Tidy: A 10-Minute Monthly Reset
Organization only sticks when there's a maintenance routine. A short monthly reset beats a big annual overhaul every time.
Set a timer for 10 minutes once a month. Empty one drawer at a time, put stray items back in their assigned spots, and wipe the drawer bottom. Then check labels and replace any that peeled off.
- Return loose items to their categories
- Check for dried glue and dead markers
- Re-stack anything that shifted
- Confirm daily tools are still within reach
That's it. Ten minutes, once a month, and the system holds.
Frequently Asked Questions
How do you organize craft supplies in drawers so they stay neat?
Start by emptying the drawer and sorting supplies by craft type, then give each category its own compartment. Keep only what fits the drawer, and set aside time to re-sort anything that has drifted.
What should you use to divide craft supplies in drawers?
Measure the drawer's inside width and depth before choosing a divider.
How do you organize beads and small craft supplies so they don't get lost?
Keep beads and other small supplies in shallow, lidded containers grouped by color or size, then set those containers inside one dedicated drawer section. A shallow drawer works better than a deep one here because you can see every container at a glance. Label each lid, and return containers to the same spot after every session. For tiny pieces like seed beads or jump rings, a compartment box inside the drawer section prevents spills from spreading.
How do you organize craft supplies when you only have a small space?
Use the drawers and cabinets you already have rather than adding furniture. Assign one drawer per craft type, stack shallow trays vertically inside deep drawers, and repurpose containers you already own before buying new ones. Fold-flat fabric organizers free up space when a category shrinks. Keep the tools you reach for daily in the easiest drawer to open, and store seasonal or occasional supplies higher up or further back.
Craft clutter wins when sorting feels like a big project. It doesn't have to be. Start with one drawer, sort by craft type, and add dividers that fit your actual measurements. The Reset Aisle makes that easier with space-saving organizers built to keep every drawer calm and under control. Get started with The Reset Aisle and turn your craft chaos into a system you can actually keep.
